Radon mitigation systems- how to reduce high radon levels in your home
Radon is an invisible and odorless radioactive gas that forms naturally in the ground. This gas can build up inside our homes and become a serious indoor air problem. In the long term, it also poses a serious health risk. After smoking, radon is the most common cause of lung cancer which makes high levels a hidden problem in many American homes. The good news is – through simple measurements and the right mitigation system it is possible to reduce levels and create a safer indoor environment.
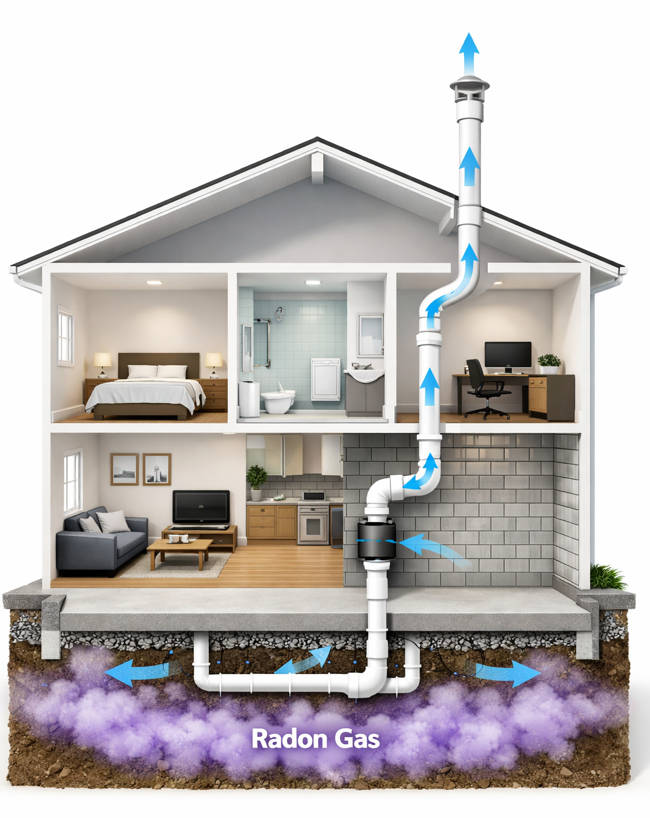
How it gets in
Radon can also enter a building from the soil below it but there are several more ways. It can move through cracks in the foundation, gaps around pipes, floor drains, crawl spaces, and other small openings. Once radon gets inside a building, it can collect in basements, ground floors, and other low areas and create a serious air problem.
What is a radon mitigation system?
A Mitigation system is a method used to lower radon levels inside a building. It is a technical installation designed to reduce the concentration of radon gas. The main goal is simple, to minimize health risks by keeping radon levels as low as possible. Installing a Mitigation system is the best way to effectively stop radon from entering a building or remove it before it builds up in the indoor air.
The system that works best depends on several things, the type of building, the foundation, and where the radon is coming from. In many homes, radon enters through the ground below the house. The design of the building and ventilation system can also affect radon levels in a negative way.
Most radon mitigation systems focus on controlling air pressure and moving radon safely out of the building. Some systems use pipes and fans to draw radon from beneath the house. Others improve air flow or help seal common entry points.
Read more about active and passive mitigation systems
Step-by-step guide- how to reduce radon levels
If your home has proven high radon levels is it important to take a clear and practical approach to solve the problem. Here is a summary of steps to take:
Step 1: Test your home
The first step is always to measure radon. It is impossible to know if you have a radon problem without testing.
Read more about radon testing here
Step 2: Review the result
Once you get the result, compare it with your national reference level or action level. If the level is too high it is important you take action to reduce it.
Even if the number is only slightly above the recommended level, it may still make sense to lower it, especially if it´s your home or a building where people spend a lot of time like schools or workspaces.
Step 3: Identify where radon enters the building
The next step is to understand how the radon gets into the building. Make sure you take a look at the foundation type and also investigate the condition of the slab or basement. If there is a crawl space it is important to inspect it to find possible entry points for the gas to get in. This step will help you to choose the right mitigation system.
Step 4: Choose the right mitigation method
The best solution depends on your home, many houses need an active soil depressurization system. Crawl spaces may need a membrane system and some homes also benefit from improved ventilation and sealing work.
The best thing to do is to book a professional radon expert who can inspect your home and then recommend the best and most effective and suitable solution for reducing radon levels in your home.
Step 5: Install the system
It is important that the installation of the mitigation system is done correctly. The fan, pipes, vent outlet, and sealed areas all need to work together in a proper way. The system must move radon safely outdoors without allowing it to re-enter the building through windows, vents, or other openings in the building.
A poorly installed system may reduce performance, so it is important to install the right solution in the right way.
Step 6: Test again after installation
Always measure radon again after the system is installed. This confirms whether the mitigation work has reduced the radon level enough.
Do not skip this step. A follow-up measurement gives clear proof that the system works properly.
Step 7: Maintain and monitor over time
Radon mitigation is not something you should forget after installation. Fans can wear out, building conditions can change, and renovations may affect air flow or foundation pressure.
Test again from time to time and check that the system still works as expected.
Different types of Mitigation systems
There is no single solution that fits every home. Below are some of the most common and effective methods you can use.
1. Sub-slab depressurization, this is one of the most common radon mitigation methods for homes built on a concrete slab or with a basement floor. It is necessary to contact a technician to install this system. They must install a pipe through the slab into the soil below the home. There will be a fan that pulls radon gas from beneath the building and vents it safely outside. This will usually be done above the roof. This helps to create lower pressure under the house, so radon moves into the pipe instead of into the indoor air. This method is often very effective and works as a long-term solution in many buildings.
2. Sump pit depressurization
If the home has a sump pit, it may be possible to use it as part of the radon mitigation system.
The sump pit is sealed and connected to a pipe and fan. The system then draws radon gas from under the house and vents it outdoors. This method can work well in homes where the sump pit already connects to the soil or drainage layer below the foundation.
3. Crawl space membrane systems
Homes with crawl spaces often need a different solution. In these cases, a plastic membrane can be placed over the exposed soil in the crawl space. A vent pipe and fan then pull radon gas from beneath the membrane and release it outside.
This method helps stop radon from entering the living spaces above the crawl space. It can also improve moisture control in some cases.
4. Improved ventilation
Ventilation can help reduce radon levels in some homes, especially when radon builds up due to poor air flow. Therefore, a mechanical ventilation system can help to bring in fresh air and remove indoor air more effectively.
Ventilation alone may not be enough if the radon level is very high, but it can support other mitigation methods and improve overall indoor air quality.
5. Sealing cracks and openings
Radon often enters through small gaps and openings in the foundation. It can be about cracks in floors and walls, gaps around service pipes, construction joints, floor drains, and other penetrations.
The most effective ways to help reduce radon entry is sealing these openings. However, sealing alone is not always enough to solve a serious radon problem. It usually works best together with an active mitigation system.
A well-functioning system can often reduce radon levels by over 90%.
Final thoughts
High radon levels can feel alarming, but there are proven ways to reduce them. The most important thing is to take action. Start by testing your home. Then review the result, identify how radon enters, choose the right mitigation system, install it correctly, and measure again.
Radon mitigation systems can make a real difference. Whether your home needs sub-slab depressurization, a crawl space membrane, better ventilation, or a combination of methods, the right solution can reduce radon and improve the air inside your home.
If a radon test shows high levels, do not ignore the result. With the right mitigation plan, you can make your home safer.
Common questions and answers about Radon mitigation systems
How effective are radon mitigation systems?
A well-designed system can lower radon from a high level to a much safer one. The exact result depends on the building and the type of system used.
Is sealing cracks enough to fix a radon problem?
Usually not. Sealing visible cracks can help, but radon often enters through many hidden paths. Sealing works best as part of a larger mitigation strategy.
Can I install a radon mitigation system myself?
Some simple steps, like sealing small gaps, may be possible to do yourself. But most effective radon mitigation systems need proper design, the right equipment, and correct installation. That is why professional help often gives the best result.
Which radon mitigation system is best?
There is no universal answer. The best system depends on the home’s construction, the source of the radon, and the measured level. Sub-slab depressurization is often one of the best methods.
What is the difference between active and passive radon systems?
A passive radon reduction system includes many of the components of an active system, but without the radon extractor fan. Instead a passive systems use the natural pressure difference in your home to move radon through options for homes with slab foundations.
How much does it cost to convert a passive radon system into an active one?
On average, homeowners can expect to pay between $800 and $2,500 or more for a radon mitigating system. Several factors can affect the cost of a radon mitigating system. For example the size of your home as a larger houses usually require more extensive and costly mitigation systems.
How long does it take to install a system?
Many systems can be installed within one or two days, depending on the complexity of the building and the chosen method.
Do I need to test again after mitigation?
Yes. A new radon test is essential. It shows whether the system is working and whether the radon level has dropped to an acceptable level.

